Monday, July 27, 2015

DIY Kitchen shelves

What do you do with a big blank wall? Ahh the age old design dilemma. Why? Because the possibilities are simply endless, Artwork, mirrors, clocks, family photos, shadow boxes, collected findings, shelves, built ins....or leave it blank. Sometimes leaving something blank makes its own statement.
 Every piece of vertical real estate does not necessarily need a tenant. 
But for this space I needed something. I don't love that my sink faces a wall. (As if dish duty wasn't dull enough!) I wanted something that felt somewhat organic or rustic to off set the clean painted finish of my kitchen cabinets, something to "warm up" this space.


So I looked around for ideas and inspiration, I found pictures (left)of what I wanted but as I started to source materials I wasn't finding what I thought would produce the look I was after.
My local hardware stores only carried inch thick boards and they lacked character. I thought I was going to have to build a box from said wood and I didn't want to. 
I was determined that my piece of wood was out there somewhere waiting for me!
I started to browse the local classifieds looking for a wood worker or saw mill and came across a guy who milled wood, I got in contact with him and explained what i was after and he said he has some elm that would fit the bill.
 I sent him these pics just to be clear we were on the same page.
I gave him the measurements I wanted and he cut 2 beautifully raw and rough shelves. 
The wood was pretty blonde and actually I could have just used it that way, but I decided to stain it for a more timeless look.
So after lightly sanding and staining and one coat of sealer they were ready to hang. I had searched in craft stores and IKEA for brackets but couldn't get what i wanted so i turned back to my local Home Improvement store and found very simple brackets that I really liked.

Here are my men in action! 
My Dad AKA Sir Don was visiting from Australia and he's just the best helper he brings comic relief to just about any situation.


Can you see the beautiful saw marks?


So once the handy men were done it was time to accessorize (that's the fun part) and best of all I already had about 90%  of this stuff stashed away in a closet just waiting for its moment in the sun..or shelf.


So final result....Happy! This is a project that turned out exactly how I had envisioned and I love what that gorgeous wood does for my space. This is a totally do-able weekend project. Here's an approx breakdown of the costs
  • 2 Boards           $70
  • Stain & Sealer   $20
  • 6 Brackets        $40     
Even with hardware for anchoring It was under $150
Let me know what you think and if this is a project you might try.




Monday, July 20, 2015

Kitchen Vol 1

Before we could add new flooring, we had to  decide on what to do with the kitchen.
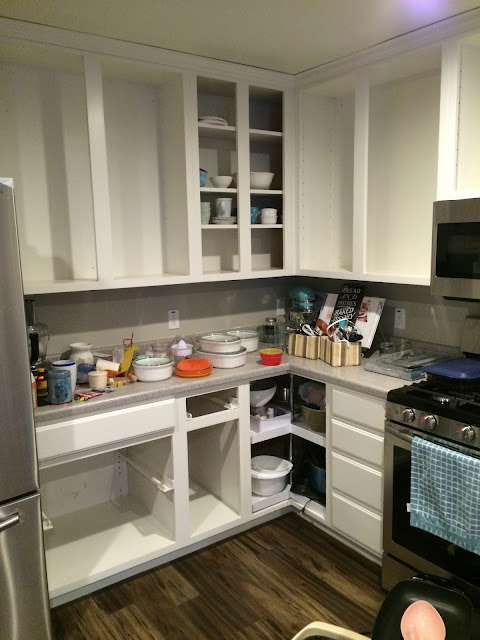
This is what it looked like when we did our final walk through.


It is an amazing size. Which is important to me because I love to cook and entertain. When we first saw this kitchen it did not excite me. I did not like the placement of the sink and left handed dishwasher placement. (sorry lefties)
I knew immediately that we would eventually put in an Island. The space was just screaming out for one.
I labelled it "fantasy island" because it wasn't going to happen for a little while, so it was just hanging out on my wish list.
We decided to keep the cabinets and just refinish them. We cleaned, sanded, accetoned, primed and painted. It was long and involved but they turned out great! I chose BM White Dove, Its a warm white but still very crisp.
We sprayed the bases first then the doors separately in our unfinished basement. While the sprayer was out we pulled every last door out of the house and gave each of them a couple of coats of fresh paint. Its amazing how grimy they can get.


We taped off the already painted kitchen. Which is a classic and a favorite warm grey, BM Revere Pewter.
We lived without doors for several weeks, Winter was slowing down our paint drying time. I kind of got used to seeing all my junk, and the plus side was that I could see where I had put everything.

Floors came next. We removed the old vinyl floor and began the search for flooring.
 I wanted a mid toned cool color
that wasn't too trendy but something interesting.
Not too dark, not too light, not too rustic, not too shiny, not too busy, I sound like Goldilocks!
We also decided on laminate Vs hardwood simply because we have a young family and I didn't want to be too precious about every minor scratch and scrape. Someday I wood love to do wood! Meanwhile the laminate has been really great.


We chose African Ironwood from Lumber Liquidators. It was easy to install, thanks to my husband and father in law, but tricky not to repeat the same planks. The variation made it more challenging.

So dusty but its coming along.


We painted all the shelves and drawers too.


Waiting for shelves to go in. We purchased our appliances at Home Depot during their Black Friday sale in November, They were not delivered until March! Luckily we hadn't tossed the old ones yet so for a little while we used those.


Finally we got the cabinet doors up and new appliances in. If you look closely I have mapped out where "Fantasy Island" will go in blue tape.
As you can see I have enough room to host "Dancing with the stars"


A side by side

"The Renno!"

We actually like to "Renno"
 (my Aussie slang for renovate)
We were particularly lucky that throughout most of this my generous In-laws hosted us until it was livable.
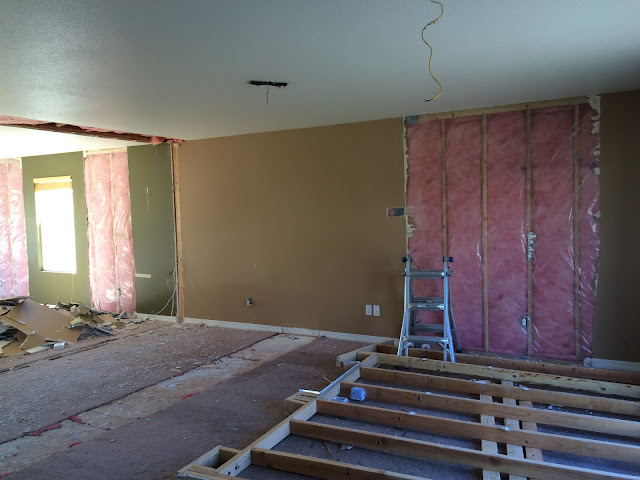
  I pieced this pic together to show how the floor plan was when we bought it.This family room was next to the kitchen and I wanted to turn it into a dining area, that made more sense to me. I wanted to bring the old wall forward 8 ft inline with the kitchen wall. The pic below shows how wide the walkway was. I really didn't like how you could see all the way to the back door from the front. It felt like a bowling lane!
Luckily that wall was not load baring, so ,we knocked it down!


Of course that means moving electrical and furnace returns.


All clear! (I was half tempted to keep it entirely open) We had to patch the sub floor because there were furnace holes that we re-routed. It doesn't look like we moved the wall far does it? (below)
But what a difference it is going to make to the overall flow.


Notice how dark it is in mid day? Dark green paint doesn't help.
 Neither did the lack of natural lighting or light fixtures. Check out that lonely window on that 30ft wall!!!
We decided while we were torn apart that we would add windows too.


We added one on either side of the existing living room window.


And made room for one in the new dining room. The next step was removing the nasty carpet. I'm not a huge fan  of carpet. It has its place. I do like it in a bedroom. My preference is a solid floor, wood, tile, concrete, anything that I can see the dirt on I prefer. Sound weird? Maybe, but carpet tends to hide and store dirt and germs that i'd just as soon get rid of and not breathe in.
The carpet removal was a big job, and what was underneath was just as nasty. Because we were laying a solid floor each staple had to come out too.
It was time consuming and unpleasant but we got there.


Goodbye carpet!! We then re-built the wall and put it in place.


Here, not only do you see my little cutie, but also the new windows!!
 Best Decision ever!
And the new wall now lines up with the kitchen.


Time to re-wire electrical, add new furnace returns and patch the hole in the ceiling. In addition to windows which made a huge impact, we added LED
 can lighting. We spaced them about every 7 ft and added 8 to the living area and 10 to the kitchen/dining. I have loved them. They don't have to warm up like the old cans they come on big and bright at the flick of a switch. Another thing I wanted to change was the wall texture. This is known as Orange Peel texture.(below) Once again its a personal preference, I wanted to get an overall smoother look (wholly smooth) and after agonizing over the cost of re-texturing walls we went for it. This project we did not do ourselves. We had a great crew come in, they were speedy and did a great job.
 It only took about 6 days,including drying time.
I did not do my closets, laundry or pantry.


Tons of Mud and Dust. But no more Orange peel!

Love those windows!


Sunday, July 19, 2015

Makeover

I just love a before and after don't you? I love a good makeover. I was a hairdresser for about 10 years and maybe that's why?
 Constantly improving a style. Revealing hidden potential.
What I love too, is that style evolves and a space is rarely ever an "after" because it keeps evolving too! Adding an accessory, changing paint colors, hanging a picture or mirror. So just when you think you have seen my "after" I just may surprise you.


Here is an example, I (mostly my very good friend) painted the front door from burgundy to SW Naval. I painted the trim BM Dove White to really make it stand out from the brick. I was thrilled with how it turned out so I painted the shutters navy too. Since then I have added new hardware to the door.
This little project was a quick fix while we worked on much larger more tedious ones inside. This is why I love paint! You can completely transform the look of something in just a few hours and for very little money. I only used a quart of paint to do the door and 4 shutters. Big Impact. Small job.


House Hunting

After returning to the US we needed to find a house. We only had a few must haves on our list

  • A 3 car garage
  • Close to a good school 
  • Enough room to host guests. 
Not asking too much right? Well after seeing a ton of homes, and exhausting our amazing realtor, we found a place to call home! 
The House was only 8 years old but it had been well loved by a large family and  needed some fixing up.
I think anytime you move in to a new place changes are necessary to
 "make it yours."
I didn't want to live in their house I wanted to live in my home, a place that felt like me, and suited our needs. 
I am really lucky that my husband is super handy and talented when it comes to tackling a house project. If i can design it he can usually execute it!
I love that together we could see the potential in this house and could see  what we wanted it to be. 
When buying an existing home, you don't get everything you want so i feel like  if you can get 80% of what you need then that a win!
 The house had amazing space. Huge closets, massive pantry, generous room sizes and storage it just seemed to lack character.
So we are still developing its personality, and conquering one space at a time.
We made some simple aesthetic changes and some major ones too. 
So it began....... RENOVATION!!!!!!!

Home Sweet Home

Lets start by talking about HOME.
"Home is where the heart is"... "The best journeys bring you Home"
"Home is where your story begins"... "Home is not a place its a feeling"
"There's no place like home"
Maybe Dorothy said it best? There is no place like home. Your Home. 
 What does HOME mean to you?
I have two homes.
I feel very much at home when I visit my hometown of Perth Australia. Its on the west coast and its simply beautiful! Its about a 22 hour flight from my current location in Salt Lake City. My entire family live there so we love to visit whenever we can. Its hard to describe the feeling of "going home."
 When that plane touches down, knowing I'm only moments away from passing my Mum her grand kids, and taking a deep breath of warm eucalyptus filled air.
Ahhh I'm Home!
Cottelsoe. My Favorite Beach. Photo Courtesy of Sarah McAllister
After living is SLC for about 10 years our family had the opportunity to trade the mountains for the ocean and  live in Australia for a couple of years and be close to grandparents, cousins and dear friends, So that's my home.We loved our time there but decided to come back to Utah and now we call it HOME.


Home can be multiple places, but ultimately, Home to me, is wherever my Family are.
Home is safety, acceptance, love, comfort, joy and peace.
This is why "There's no place like home."